Creative Card-iology Team December
"Gift Card
Holders/Treat Packaging"Blog Hop
For our December blog, we are making,
Gift Card Holders or fun Treat packaging items.
This Blog Hop came at the right time as I need several GIFT CARD holders,
plus 12 additional ones for a different use on Christmas Day.
Gift Cards makes Christmas shopping a lot easier.
Since I need several, I found these to be super easy
which means I can make them fast.
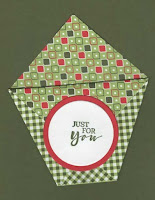
For this project, I chose to make
Diaper Fold Credit Card Holder
Here are the supplies I used to make this card:
Mossy Meadow Cardstock (CS) - 133676
Real Red Basic White Cardstock - 159276
Heartwarming Hugs Designer Series Paper - 153492
Various Stamp Sets:
Poinsettia Petals - 153475
Holly Jolly Wishes - 156362
For Unto Us - 153335
Penguin Place - 156-410
Sweet Strawberry - 154394
Rainbow of Happiness - 157721
Layering Circles Dies - 151770
Holiday Rhinestones Basic Jewels - 150457
Bone Folder - 102300
Dimensionals - 144108
Stampin' Cut & Emboss Machine - 149653
Stampin' Seal - 152813
Paper Snips - 103579
Take Your Pick Tool - 144107
Paper Trimmer - 152392
Simply Scored Scoring Tool - 122334
Simply Scored Diagonal Scoring Plate - 125586 (Retired)
Stampin' Scrub - 126200
Stampin' Mist - 153648
Simply Shammy – 147042
Silicone Craft Sheet -127853
Clear Block B - 117147Clear Block C - 118486
HERE ARE THE INSTRUCTIONS TO MAKE THESE GIFT CARD HOLDERS
In this tutorial the
name Seal is referring to the use of the new Stampin' Seal
- Cut your 12"x12" DSP at 6" then put both pieces together turn 90˚and cut again at 6" giving you four 6" squares. Alternate choice is to use any 6"x6" DSP.
- We are going to fold the 6"x6" square corner to opposite corner. I recommend you score before folding making the corner fold easier to be more perfect. I used the Diagonal Scoring Plate, which is retired, but there are many ways to score and then fold. If you look close you can see the score line.
- Burnish with your Bone Folder.
- With the folded points facing up, with the fold along the bottom, take the right folded tip across to the left side forming a horizontal line.
- Take the left folded tip across to the right, aligning with the horizontal line.
- Burnish both folds.
- Pull the top folded point down covering the folds and adhere, creating a pocket for your Gift Card or other goodies.
- Using the Layering Circle Dies, cut a Real Red or Mossy Meadow 1⅞” Circle and a Basic White 1⅝” Circle.
- Stamp your greeting on the Basic White and adhere to the color CS.
- Add a dimensional to the back of the color CS and adhere your greeting to the front.
- To add the final touches, place a couple of Holiday Rhinestones to the front.
There
will be 12 people together for dinner on Christmas Day and I made 12 of
these to set on the table, with Ghirardelli Chocolate Squares.
Hope you enjoyed this tutorial.
These are fun and easy to make and can be made in a matter of minutes.
Please feel free to leave me a comment and let me know you were here.
Click on the names below to visit the other team member's blogs and
see what amazing projects they have created to inspire you!
Please feel free to leave me a comment, and thanks for stopping by.
see what amazing projects they have created to inspire you!
Please feel free to leave me a comment, and thanks for stopping by.
Diana Buckingham (You are Here)


What a great gift!
ReplyDelete