

This month's theme is to create a "Scrapbook Page"
using any current products.
For this project I choose the
FLOWERING FIELDS SUITE
157685 - $126.75
which contain
Flowering Tulips Bundle
Tulip Fields Bundle
Evening Evergreen ⅜" Windowpane Check Ribbon
Brushed Brass Butterflies
Flowering Fields 12" x 12" Designer Series Paper
Click Here to place an order or visit my website

HERE ARE THE SUPPLIES USED TO MAKE THESE SCRAPBOOK PAGES
Flowering Tulips Bundle - 157678
Flowering Tulips Stamp Set - 157672
Tulips Dies - 157677
Tulips Fields Bundle - 157684
Tulip Fields Stamp Set - 157682
Windmill Fields Dies - 157683
Brushed Brass Butterflies - 158136
Flowering Fields 12" x 12" Designer Series Paper (DSP) - 157670
Basic White 12" x 12"Cardstock (CS) - 159231
Basic White 8" x 11"Cardstock - 159276
Poppy Parade Cardstock - 119793
Petal Pink Cardstock - 146985
Pear Pizazz Cardstock - 131201
Basic Black Cardstock - 121045
Evening Evergreen Ink - 155574
Pear Pizazz Ink - 147104
Stampin Blends
Petal Pink - 154893
Poppy Parade - 153112
Stampin' Seal - 152813
Mini Stampin' Dimensionals - 144108
Paper Snips – 103579
Take Your Pick Tool – 144107
Bone Folder –102300
Paper Trimmer –152392
Simple Shammy –147042
Silicone Craft Sheet –127853
Stampin' Pierce Mat - 126199
Stampin' Cut & Emboss Machine - 149653
HERE ARE THE INSTRUCTIONS I USED TO MAKE THIS PROJECT
In this tutorial the name Seal is referring to the use of the Stampin' Seal Adhesive
In this tutorial the name Seal is referring to the use of the Stampin' Seal Adhesive
Page 1
- Start with the Polka Dot paper from the Flowering Fields 12" x 12" DSP
- Cut the Tulip paper to 8⅛" x 10" and adhere to the Polka Dot DSP

- Cut Poppy Parade 4¼" x 6¼" (need 2)
- Cut Basic White 4" x 6" (need 2) or add pictures
- Adhere both Poppy Parade pieces and adhere to the Tulip DSP
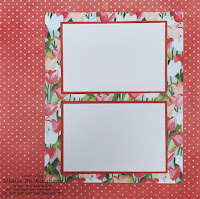
- Cut Basic White 1½" x 1½" (need 7)
- Adhere the pointed corners up, down the left side overlapping them

- Die cut a variety of tulips using the Flowering Tulip Dies
- Adhere one to each of the pointed squares

- Stamp the large and small leaves and stem on Pear Pizazz with Pear Pizazz ink, then using the Tulip Dies, run them thru the Stampin' Cut and Emboss Machine
- Make another Tulip then adhere to the right side
- To add a little touch add some of the Brushed Brass Butterflies


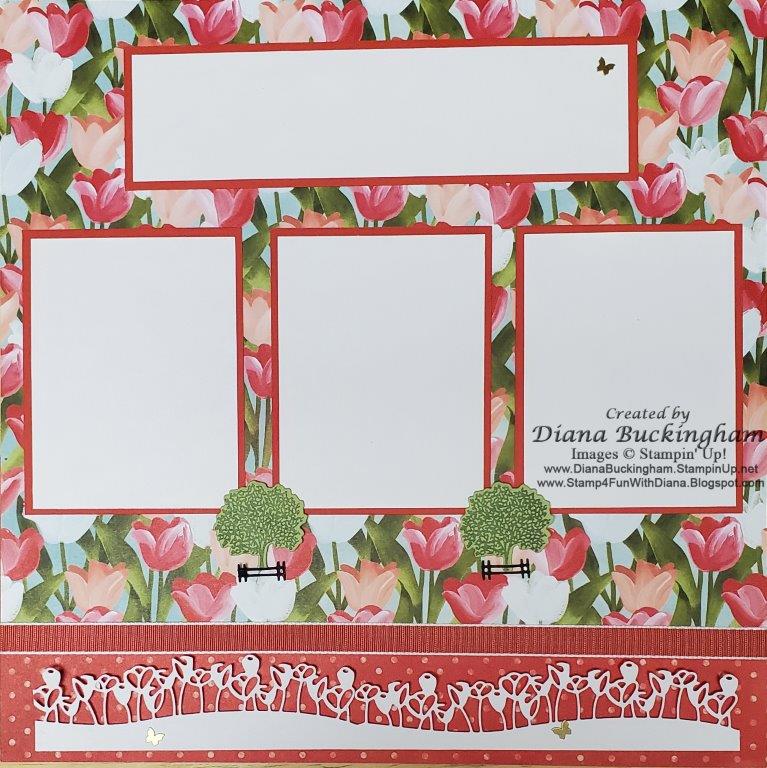
Page 2
- Start with the Polka Dot paper from the Flowering Fields 12" x 12" DSP
- Cut 2" of the bottom of the Tulip paper making it 12" x 10"
- Adhere the Tulip paper to the Polka Dot paper

- Cut Poppy Parade 2¼" x 8"
- Cut Basic White 2" x 7¾"
- Adhere this Poppy Parade piece near the top for a Title

- Cut Poppy Parade 4½" x 3½" (need 3)
- Cut Basic White 4¼" x 3¼" (need 3) or add pictures
- Adhere all 3 Poppy Parade pieces and adhere to the Tulip DSP

- Stamp the tree from the Tulip Field Stamp Set, then using the tree die from the Windmill Field Dies (need 2)
- Add dimensionals to the back of the trees and adhere at the bottom between the 3 pictures
- Using Basic Black CS, die cut 2 fence pieces from the Windmill Field Dies
- Adhere over the trunk of the trees
- Cut a piece of Basic White 1¾" x 11"
- Using the long die of Tulips, die cut half of the 11" strip, line it up again and run again thru the Stampin' Cut and Emboss machine
- Use dimensional and adhere to the bottom of the page
- Cut a piece of ribbon 14" and adhere over the seam of DSP
- To add a little touch add some of the Brushed Brass Butterflies
 Here are the completed two page spread


Please feel free to leave me a comment and thanks for hopping by.
Click on the names below to visit our other team member's blogs and